The chassis for this build is of a clamshell style, comprised of two Fat Daddio 16"x12"x3" anodized aluminum rectangular cake pans. Since the material is aluminum and not too thick, the casework is relatively pleasant, though I must admit that the sides can distort as the aluminum is not particularly strong. In any case, I don't regret going down this route... at least, not yet.
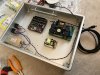
First photo (IMG_9823) shows some of the layout work. At this point I had already mounted the power entry module and two power switches (1 for the Aurora power supply and 1 for the amp power supply). Those went pretty easily with a Dremel with abrasive cutting disc and a rectangular file. As for what's actually in the photo, I CADed the mounting hole layouts for the PCBs, printed them onto paper, and taped them to the pan so that I could punch the centers. Here is where I realized that my printer is not particularly accurate; on a ~140 mm span (I think lengthwise on the paper) the printed center-to-center distance is about 0.5-0.75 mm longer than what drawing calls for. Good thing I checked before I ended up with useless holes! My first solution was to score the paper with my digital calipers fixed to the correct distances, but eventually I just resorted to laying the PCB on the paper and then tracing out the insides of the mounting holes using a mechanical pencil. This actually worked surprisingly well, so much so that in the future I'll probably do away with the CAD & paper.
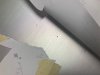
Second photo (IMG_9824) shows the marks from a Flexbar optical center punch. Love this thing. Not quite perfect (mainly an ergonomics thing) but it definitely makes quick work of punching accurate centers. One of the optical sight guides they provide with the unit has a sighting circle that pretty much lined up perfectly with the pencil-traced circles I drew beforehand, so if I had to guess, the accuracy of the punch marks is probably better than +/- 0.2 mm assuming perfect "centricity" on the included Flexbar optics and center punches.
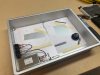
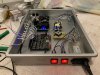
Third photo (IMG_9826) shows the PCBs in place. I was expecting everything to fall into place, but it's still a relief when it actually does. Any guesses as to what the drawer pull and the as-yet-unused 1/4" bolts around the perimeter are for?
The amp modules will go into the other cake pan (not shown in any of these photos)


")