
-
WANTED: Happy members who like to discuss audio and other topics related to our interest. Desire to learn and share knowledge of science required. There are many reviews of audio hardware and expert members to help answer your questions. Click here to have your audio equipment measured for free!
You are using an out of date browser. It may not display this or other websites correctly.
You should upgrade or use an alternative browser.
You should upgrade or use an alternative browser.
Room Measurement Tutorial for Dummies Part 2
- Thread starter amirm
- Start date
- Joined
- Dec 18, 2021
- Messages
- 189
- Likes
- 286
Room Measurement Tutorial for Dummies Part 2: Selecting a Measurement Microphone
I hope everyone has read the first part of this tutorial on downloading and installing Room EQ Wizard. Here is the link to that if you missed it: https://www.audiosciencereview.com/...om-measurement-tutorial-for-dummies-part-1.4/
In there, I explained how you can use the built-in microphone in your laptop to become familiar with how REW works. I hope you have done that as it is critical to learn the program first before complicating it with external hardware and such.
For real measurements though, you want to use a purpose-built measurement microphone and that is the topic of this installment. Measurement microphones are just that: designed for room and loudspeaker measurements and not necessarily sound good for recording and such. They also tolerate high SPLs (volume).
There are a number of measurement microphones from multi-thousand dollar industry reference Brüel & Kjær (B&K) (see http://www.bksv.com/doc/ba5105.pdf) to cheap USB Microphones and some in between. Happily for what we are going to do, even the cheapest microphone will do. Our room response variations in low frequencies are many dBs, dwarfing any small accuracy differences between measurement microphones. Now, if you are doing this for a living and want to publish papers and such, and have others be able to replicate your work, then you need to buy the B&K and have it routinely calibrated. But that is not the business we are in.
In the lower end of the market, you have a choice of buying a microphone that outputs analog signals and hence needs an adapter of sorts, usually a USB “sound card,” and typically one with phantom power. My strong recommendation is to not do that. Instead, get yourself an all-in-one USB microphone. These are plug-and-play. What comes out is a USB cable and both Mac and Windows PCs have built-in drivers for them.
One criticism of USB microphones is that they may not work for timing analysis in REW. As you will see, we will NOT be using timing analysis in REW. In that regard, there is no compromise in using a USB microphone and you get all the simplicity of them with no drawbacks.
The “in” microphone to use with REW seems to be seasonal thing. A couple of years ago when I bought mine, the Dayton Audio UMM_6 was the one to get http://www.daytonaudio.com/index.php/umm-6-usb-measurement-microphone.html. I just looked on Amazon for it and for some strange reason, it shows a lead time of 2 to 6 months to purchase from the company. Fortunately, Parts Express also sells through Amazon and they seem to have them in stock: http://www.amazon.com/Dayton-Audio-UMM-6-Measurement-Microphone%2014/dp/B00HE8OS9A/ref=sr_1_2?ie=UTF8&qid=1436622573&sr=8-2&keywords=UMM-6+microphone. As you see, the discounted cost is just $88.
Another option is the Minidsp UMIK-1: http://www.minidsp.com/products/acoustic-measurement/umik-1. I can’t find a good price for that on Amazon but as you see in that link, the company itself sells it for $75.

Before you hit the buy button, let me talk about calibration. Both the UMM-6 and UMIK-1 come with a serial number that you type online and it gives you a (supposedly) a calibration file to use with REW. My recommendation is to not bother! Yes, you heard me right. You don’t need a calibrated mic and these files themselves can be faulty. The difference between calibrated and non-calibrated mics is small and it is in a region that I suggest you use your ear, not an instrument, to adjust the sound.
Now, if you insist on having them calibrated, there is a very low cost way to get there and that is to buy the above microphones from Cross Spectrum Labs: http://cross-spectrum.com/. For just $20 to $30, you get the same microphone but now it comes with a calibration file (or multiple for different angles). I was in a hurry when I bought mine so I bought it on Amazon. If I were not, I would have spent a few more dollars on Cross-Spectrum to support this nice service as calibration usually is a very expensive affair. But again, it is not necessary.
Once you get your microphone, then all you have to do is plug it and either tell your operating system it is the default recording device, or tell REW to use it instead of the built-in microphone. Now repeat the lessons in the first tutorial. Compare the results to the built-in microphone. You should see less low frequency roll off and more accurate overall curve.
In the next tutorial we will get into the meat of these of lessons which is to actually perform the measurements and understand what they mean.
@amirm Did you ever make part 3? Part 2 was quite some time ago… thanksMy pleasure and my welcome also. So many projects and so little time but thanks for the reminder to work on Part 3.")
ClaudeJ1
Member
- Joined
- Aug 8, 2021
- Messages
- 35
- Likes
- 30
Before the UMIK existed, aout 16 years ago, I got a 2 channel, bi directional interface with Phantom Power and Mic Volume, Line out put vol, computer volume, etc. IOW, not as easy and simple as today. My good friend's son went from Audio Engineer to Sales Engineer when they eliminated the Automotive Audio Department and gave him all the gear they had, including a $2,000 Earthworks Microphone. I simply plugge mine into the XLR connector and ran the same sweep. The $50 Behringer (mine) had the exact curve as the expensive one with only 1/4 db difference at 18 Khz. which very few men can hear anyhow.Here is the CSL file of my UMIK-1's response. It is down a couple of dB around 10 Hz, and has a fairly broad hump peaking a little over 3 dB at about 9 kHz, though the hump is only a dB or so used at 90 degrees as is more usual for HT measurements. The CSL calibration file renders it essentially flat and it measures the same as my Earthworks M30 from 5 Hz to 20+ kHz. The UMIK-1 rolls off sharply over ~20 kHz, however, where my M30 is flat to around 30 kHz. So, for normal measurements, I agree with Amir than calibration isn't really needed, but I like having the accuracy (especially for measurements when I want to point the mic at the speakers), and for the extra $25 or so consider it cheap. It does not match the noise floor or dynamic range of my M30, but frequency response after cal is a wash, which I think is pretty good for a $100 investment (compared to ~$700 for my M30, on sale -- I noticed they have dropped MSRP to around $900, down from $1200 or so when I bought me some years back).
FWIWFM - Don
View attachment 5808
Keith_W
Major Contributor
Before the UMIK existed, aout 16 years ago, I got a 2 channel, bi directional interface with Phantom Power and Mic Volume, Line out put vol, computer volume, etc. IOW, not as easy and simple as today. My good friend's son went from Audio Engineer to Sales Engineer when they eliminated the Automotive Audio Department and gave him all the gear they had, including a $2,000 Earthworks Microphone. I simply plugge mine into the XLR connector and ran the same sweep. The $50 Behringer (mine) had the exact curve as the expensive one with only 1/4 db difference at 18 Khz. which very few men can hear anyhow.
I have an Earthworks M30 microphone and two Behringer ECM8000's. We are talking AUD$1300 vs. AUD$80.
The Earthworks costs more because it has a very lightweight diaphragm that can apparently measure up to 30kHz. The Behringer "only" goes up to 20kHz. Although both are made of metal, the Earthworks feels more solid and this thing was probably milled from a bar of steel. The Behringer looks like it was cast and then powder coated.
All Earthworks mics are supplied with calibration curves. The Behringer doesn't have one, unless you pay extra and buy the calibrated version.
In use, I note that the Earthworks is about 20dB more sensitive than the Behringer (I have to turn up the gain on the mic preamp more).
I have been told that there is more of a difference if I were to use the mic to record music and audio. I don't do that, I use it for measurement only.
If I were to do it all over again, I would not bother with the Earthworks M30. For our purpose, the Behringer is good enough.
Despite the recent clock adjustment additions based on acoustic reference chirps at the beginning and at the end, USB mics still can't get the phase response as precise as an analog mic. I had to change my box phase alignment in rePhase from "low Q" to "standard Q" after years with Umik-2 when I measured with a Behringer.
Last edited:
kolestonin
Active Member
- Joined
- Jul 5, 2021
- Messages
- 167
- Likes
- 92
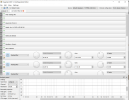
What can be the cause my correction curve is not reflected in the analysis panel?
I am following below tutorial and I was able to replicate all the steps till 13:50 of the video. When I do this 13:30 step my curve does not appear in the analysis panel. I have a flat line as you can see in the photo I attach.
I am following below tutorial and I was able to replicate all the steps till 13:50 of the video. When I do this 13:30 step my curve does not appear in the analysis panel. I have a flat line as you can see in the photo I attach.
Attachments
Last edited:
You have to select the correct config file from the bottom left corner.What can be the cause my correction curve is not reflected in the analysis panel?
I am following below tutorial and I was able to replicate all the steps till 13:50 of the video. When I do this 13:30 step my curve does not appear in the analysis panel. I have a flat line as you can see in the photo I attach.
kolestonin
Active Member
- Joined
- Jul 5, 2021
- Messages
- 167
- Likes
- 92
That did it!
I guess my curve looks terrible though(it does not seem similar to anything I saw so far) and I will need to start the process of measuring+importing from scratch.
Doing some more reading and more videos watching before.


I guess my curve looks terrible though(it does not seem similar to anything I saw so far) and I will need to start the process of measuring+importing from scratch.
Doing some more reading and more videos watching before.
Last edited:
killitmore
Member
- Joined
- Jul 25, 2022
- Messages
- 21
- Likes
- 2
Hi guys,
I measured my room for the first time I used REW and measure both L+R channel.
THe result was that my untreated room is too good (only +-2db from 60Hz to 20khz).
I wonder if i did some thing wrong or my tools are broken. I followed the instruction on REW website. Loaded my sound card calibration file, no mic calibration file (the instruction stated that i can skip that file if the file is not available), calibrated input level to 80db
Tools i used: Icon upod pro soundcard, Mic isk at 100 (these tools are popular in my country)
Belows are some screenshots of my result


I measured my room for the first time
I used REW and measure both L+R channel.THe result was that my untreated room is too good (only +-2db from 60Hz to 20khz).
I wonder if i did some thing wrong or my tools are broken. I followed the instruction on REW website. Loaded my sound card calibration file, no mic calibration file (the instruction stated that i can skip that file if the file is not available), calibrated input level to 80db
Tools i used: Icon upod pro soundcard, Mic isk at 100 (these tools are popular in my country)
Belows are some screenshots of my result
Attachments
Last edited:
You should always measure L & R speakers separately, frequency range should be 0-24,000Hz for 48kHz sampling rate, loopback (or acoustic if you can't hook that up) timing reference should be used. L&R combined measurement might be hiding lots of dips and peaks.Hi guys,
I measured my room for the first time
THe result was that my untreated room is too good (only +-2db from 60Hz to 20khz).
I wonder if i did some thing wrong or my tools are broken. I followed the instruction on REW website. Loaded my sound card calibration file, no mic calibration file (the instruction stated that i can skip that file if the file is not available), calibrated input level to 80db
Tools i used: Icon upod pro soundcard, Mic isk at 100 (these tools are popular in my country)
Belows are some screenshots of my result
View attachment 292976
View attachment 292973
View attachment 292974
Another less probable possibility is that, you've measured your soundcard response. Btw, you're using an old version of REW, the new early access version has many new features some of which increase measurement accuracy.
Robocop
Member
OCA where would you position microphone to measure L & R separately?
killitmore
Member
- Joined
- Jul 25, 2022
- Messages
- 21
- Likes
- 2
At ear height at your listening position where your head would be. This position should ideally be equal distance to both speakers.OCA where would you position microphone to measure L & R separately?
If you will measure at multiple positions around the LP, pointing the mic upwards will keep the capsule angle consistent between measurements. If you will measure only at the central position, pointing forward has more accuracy in the high frequencies. So long as you use the right calibration file, there'll not be a difference significant enough to change the correction required.How should the microphone (UMIK 1) be placed, towards the speakers or upwards?
Bow_Wazoo
Addicted to Fun and Learning
- Joined
- Jan 3, 2021
- Messages
- 785
- Likes
- 684
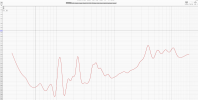
Since yesterday I have the Monitor Audio Silver 300 6G here. The FR looks like this.

The dips at 65 and 180 Hz, are hardly affected,
by slightly moving the speakers, away from the outer wall, right? Unfortunately, I only have minimal leeway in terms of placement.
Going to mount some bass traps next.

The dips at 65 and 180 Hz, are hardly affected,
by slightly moving the speakers, away from the outer wall, right? Unfortunately, I only have minimal leeway in terms of placement.
Going to mount some bass traps next.
Those dips are room modes and will not change with speaker location. I would suggest applying FDW and use a target curve like Harmon before EQ'ing if you really want to EQ frequencies above 200Hz and you can allow up to 5dB boost for auto EQ up to 200Hz.Since yesterday I have the Monitor Audio Silver 300 6G here. The FR looks like this.
View attachment 308765
The dips at 65 and 180 Hz, are hardly affected,
by slightly moving the speakers, away from the outer wall, right? Unfortunately, I only have minimal leeway in terms of placement.
Going to mount some bass traps next.
View attachment 308766
Similar threads
- Replies
- 19
- Views
- 1K
- Replies
- 123
- Views
- 6K
- Replies
- 167
- Views
- 25K
- Replies
- 2
- Views
- 296
- Replies
- 6
- Views
- 545