
Hi
Now Roon 1.2 is out it finally suports Raspberry Pis as endpoints. I have just written out some instructions for someone in another forum as to how to get this going. Unfortunately at the moment Roon have not released a simple complete image for install, but its not too painful to get it working without.
I will just caveat the following instructions by saying my knowledge of linux is very minimal, but I strung these steps together and it worked fine.
I am going to assume that you are not going to connect a keyboard and monitor to the Pi. We can set up without that no problem.
OK, first download the following items to your PC:
. Advanced IP scanner - we will use this to find out what IP address your PI has been assigned on your network. We need this to be able to talk to it. Install.
http://filehippo.com/download_advanc...1e7500f3a60b9/
. Putty - a telnet client which we will use to talk to the Pi. Its just an EXE, stick it directly on your desktop
https://the.earth.li/~sgtatham/putty.../x86/putty.exe
. Raspian Jessie Image. The OS. Unzip.
https://downloads.raspberrypi.org/raspbian_lite_latest
. Win32 Disk Imager - Used to write the OS image to a micro SD card. Install
https://sourceforge.net/projects/win...atest/download
Next put your micro SD card (I think a 2gb card is big enough) into your PC and run Win32 Disk Imager. Point it at the Jessie lite image file you unzipped and the SD card. Click write.This will take a minute or 2 to write the OS to the card. Once done place card in Pi.
Next connect Pi to your network with an ethernet cable (to your router or switch). This is necessary until your WiFi is set up.
Turn Pi on and OS will run, wait about a minute.
Next run IP scanner and click scan. This will produce a list of all items connected to your network. Look for the Pi. It should say "Raspeberry Pi Foundation and have the IP address such as 192.168.1.18
Next Run Putty. In the Host Name box type the IP address found in the previous step and click the Open button at the bottom. A black telnet window will open. If you get a security alert just click yes and ignore.
At Login type: pi then hit rtn
At Password type: raspberry then hit rtn
You should now have a green prompt thus:
pi@raspberrypi:~ $
Next we need to install Roon bridge software. Ref this https://kb.roonlabs.com/LinuxInstall
At the prompt type followed by hitting rtn (you can copy the lines below and then right click in putty and it pastes):
cd /opt
type:
sudo curl -O http://download.roonlabs.com/builds/roonbridge-installer-linuxarmv7hf.sh
type:
sudo chmod +x roonbridge-installer-linuxarmv7hf.sh
type:
sudo ./roonbridge-installer-linuxarmv7hf.sh
The installer will now run, type Y rtn.
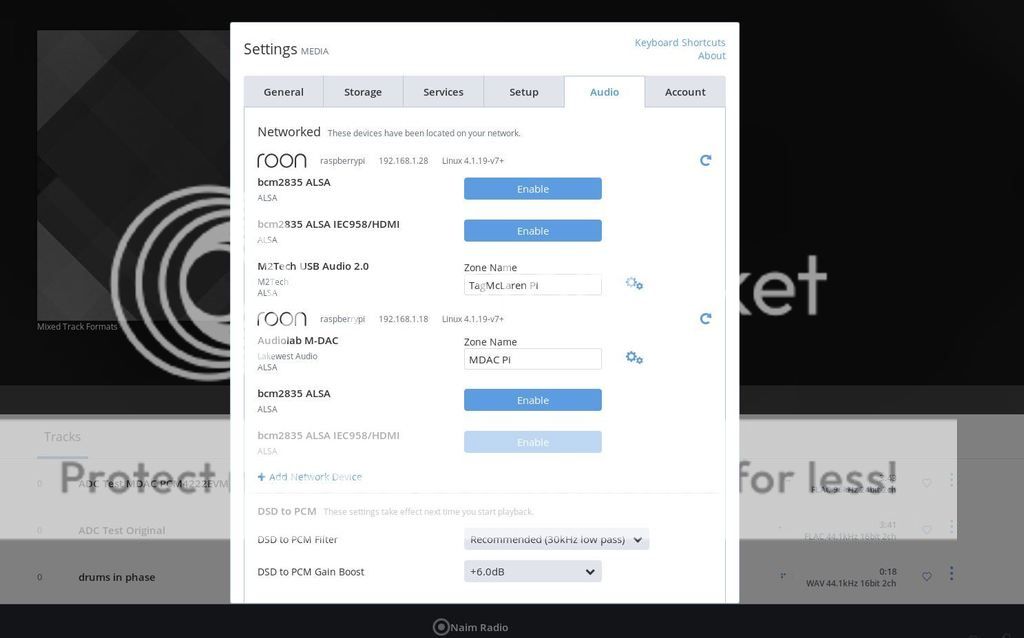
Plug your USB DAC into the Pi. Bingo! thats it! The Pi and DAC should now appear in roon as a networked device! Yay! Setup as usual.
Last thing is to get wifi working if you need it. You need to edit and add a few lines to one file.
Type:
sudo nano /etc/wpa_supplicant/wpa_supplicant.conf
and copy the following into the file, obviously putting in your WiFi SSID and password. Use your up and down arrows to move the command prompt below the existing text.
network={
ssid="network name"
psk="my password"
}
See this link here
https://thepihut.com/blogs/raspberry...an-jessie-lite
To close and write the file click
CTRL and X (rtn)
followed by
Y (rtn)
followed by
(rtn)
Now reboot the pi.
Thats it
hope that all works shout if not
cheers
Now Roon 1.2 is out it finally suports Raspberry Pis as endpoints. I have just written out some instructions for someone in another forum as to how to get this going. Unfortunately at the moment Roon have not released a simple complete image for install, but its not too painful to get it working without.
I will just caveat the following instructions by saying my knowledge of linux is very minimal, but I strung these steps together and it worked fine.
I am going to assume that you are not going to connect a keyboard and monitor to the Pi. We can set up without that no problem.
OK, first download the following items to your PC:
. Advanced IP scanner - we will use this to find out what IP address your PI has been assigned on your network. We need this to be able to talk to it. Install.
http://filehippo.com/download_advanc...1e7500f3a60b9/
. Putty - a telnet client which we will use to talk to the Pi. Its just an EXE, stick it directly on your desktop
https://the.earth.li/~sgtatham/putty.../x86/putty.exe
. Raspian Jessie Image. The OS. Unzip.
https://downloads.raspberrypi.org/raspbian_lite_latest
. Win32 Disk Imager - Used to write the OS image to a micro SD card. Install
https://sourceforge.net/projects/win...atest/download
Next put your micro SD card (I think a 2gb card is big enough) into your PC and run Win32 Disk Imager. Point it at the Jessie lite image file you unzipped and the SD card. Click write.This will take a minute or 2 to write the OS to the card. Once done place card in Pi.
Next connect Pi to your network with an ethernet cable (to your router or switch). This is necessary until your WiFi is set up.
Turn Pi on and OS will run, wait about a minute.
Next run IP scanner and click scan. This will produce a list of all items connected to your network. Look for the Pi. It should say "Raspeberry Pi Foundation and have the IP address such as 192.168.1.18
Next Run Putty. In the Host Name box type the IP address found in the previous step and click the Open button at the bottom. A black telnet window will open. If you get a security alert just click yes and ignore.
At Login type: pi then hit rtn
At Password type: raspberry then hit rtn
You should now have a green prompt thus:
pi@raspberrypi:~ $
Next we need to install Roon bridge software. Ref this https://kb.roonlabs.com/LinuxInstall
At the prompt type followed by hitting rtn (you can copy the lines below and then right click in putty and it pastes):
cd /opt
type:
sudo curl -O http://download.roonlabs.com/builds/roonbridge-installer-linuxarmv7hf.sh
type:
sudo chmod +x roonbridge-installer-linuxarmv7hf.sh
type:
sudo ./roonbridge-installer-linuxarmv7hf.sh
The installer will now run, type Y rtn.
Plug your USB DAC into the Pi. Bingo! thats it! The Pi and DAC should now appear in roon as a networked device! Yay! Setup as usual.
Last thing is to get wifi working if you need it. You need to edit and add a few lines to one file.
Type:
sudo nano /etc/wpa_supplicant/wpa_supplicant.conf
and copy the following into the file, obviously putting in your WiFi SSID and password. Use your up and down arrows to move the command prompt below the existing text.
network={
ssid="network name"
psk="my password"
}
See this link here
https://thepihut.com/blogs/raspberry...an-jessie-lite
To close and write the file click
CTRL and X (rtn)
followed by
Y (rtn)
followed by
(rtn)
Now reboot the pi.
Thats it
hope that all works shout if not
cheers
Last edited:
") but I'm sure a bit of googling will provide the answer regarding specific device drivers.
but I'm sure a bit of googling will provide the answer regarding specific device drivers.